Contents
-
Building AI Agents in 30 Minutes from Prototype to Production
- Building, evaluating and deploying production-ready AI agents using Agents CLI in Agent Platform
- Introduction
- The Agent Deployment Problem
- What is Agents CLI?
- Building an Expense Approval Agent
- Prerequisites
- Step 1: Project Scaffolding
- Step 2: Implementing Business Logic
- Step 3: Local Testing
- Step 4: Writing Structured Evaluations
- Step 5: Deploying to Production
- Step 6: Observability
- What Makes Agents CLI Different
- Beyond the Basics
- Techniques Summary
- Conclusion
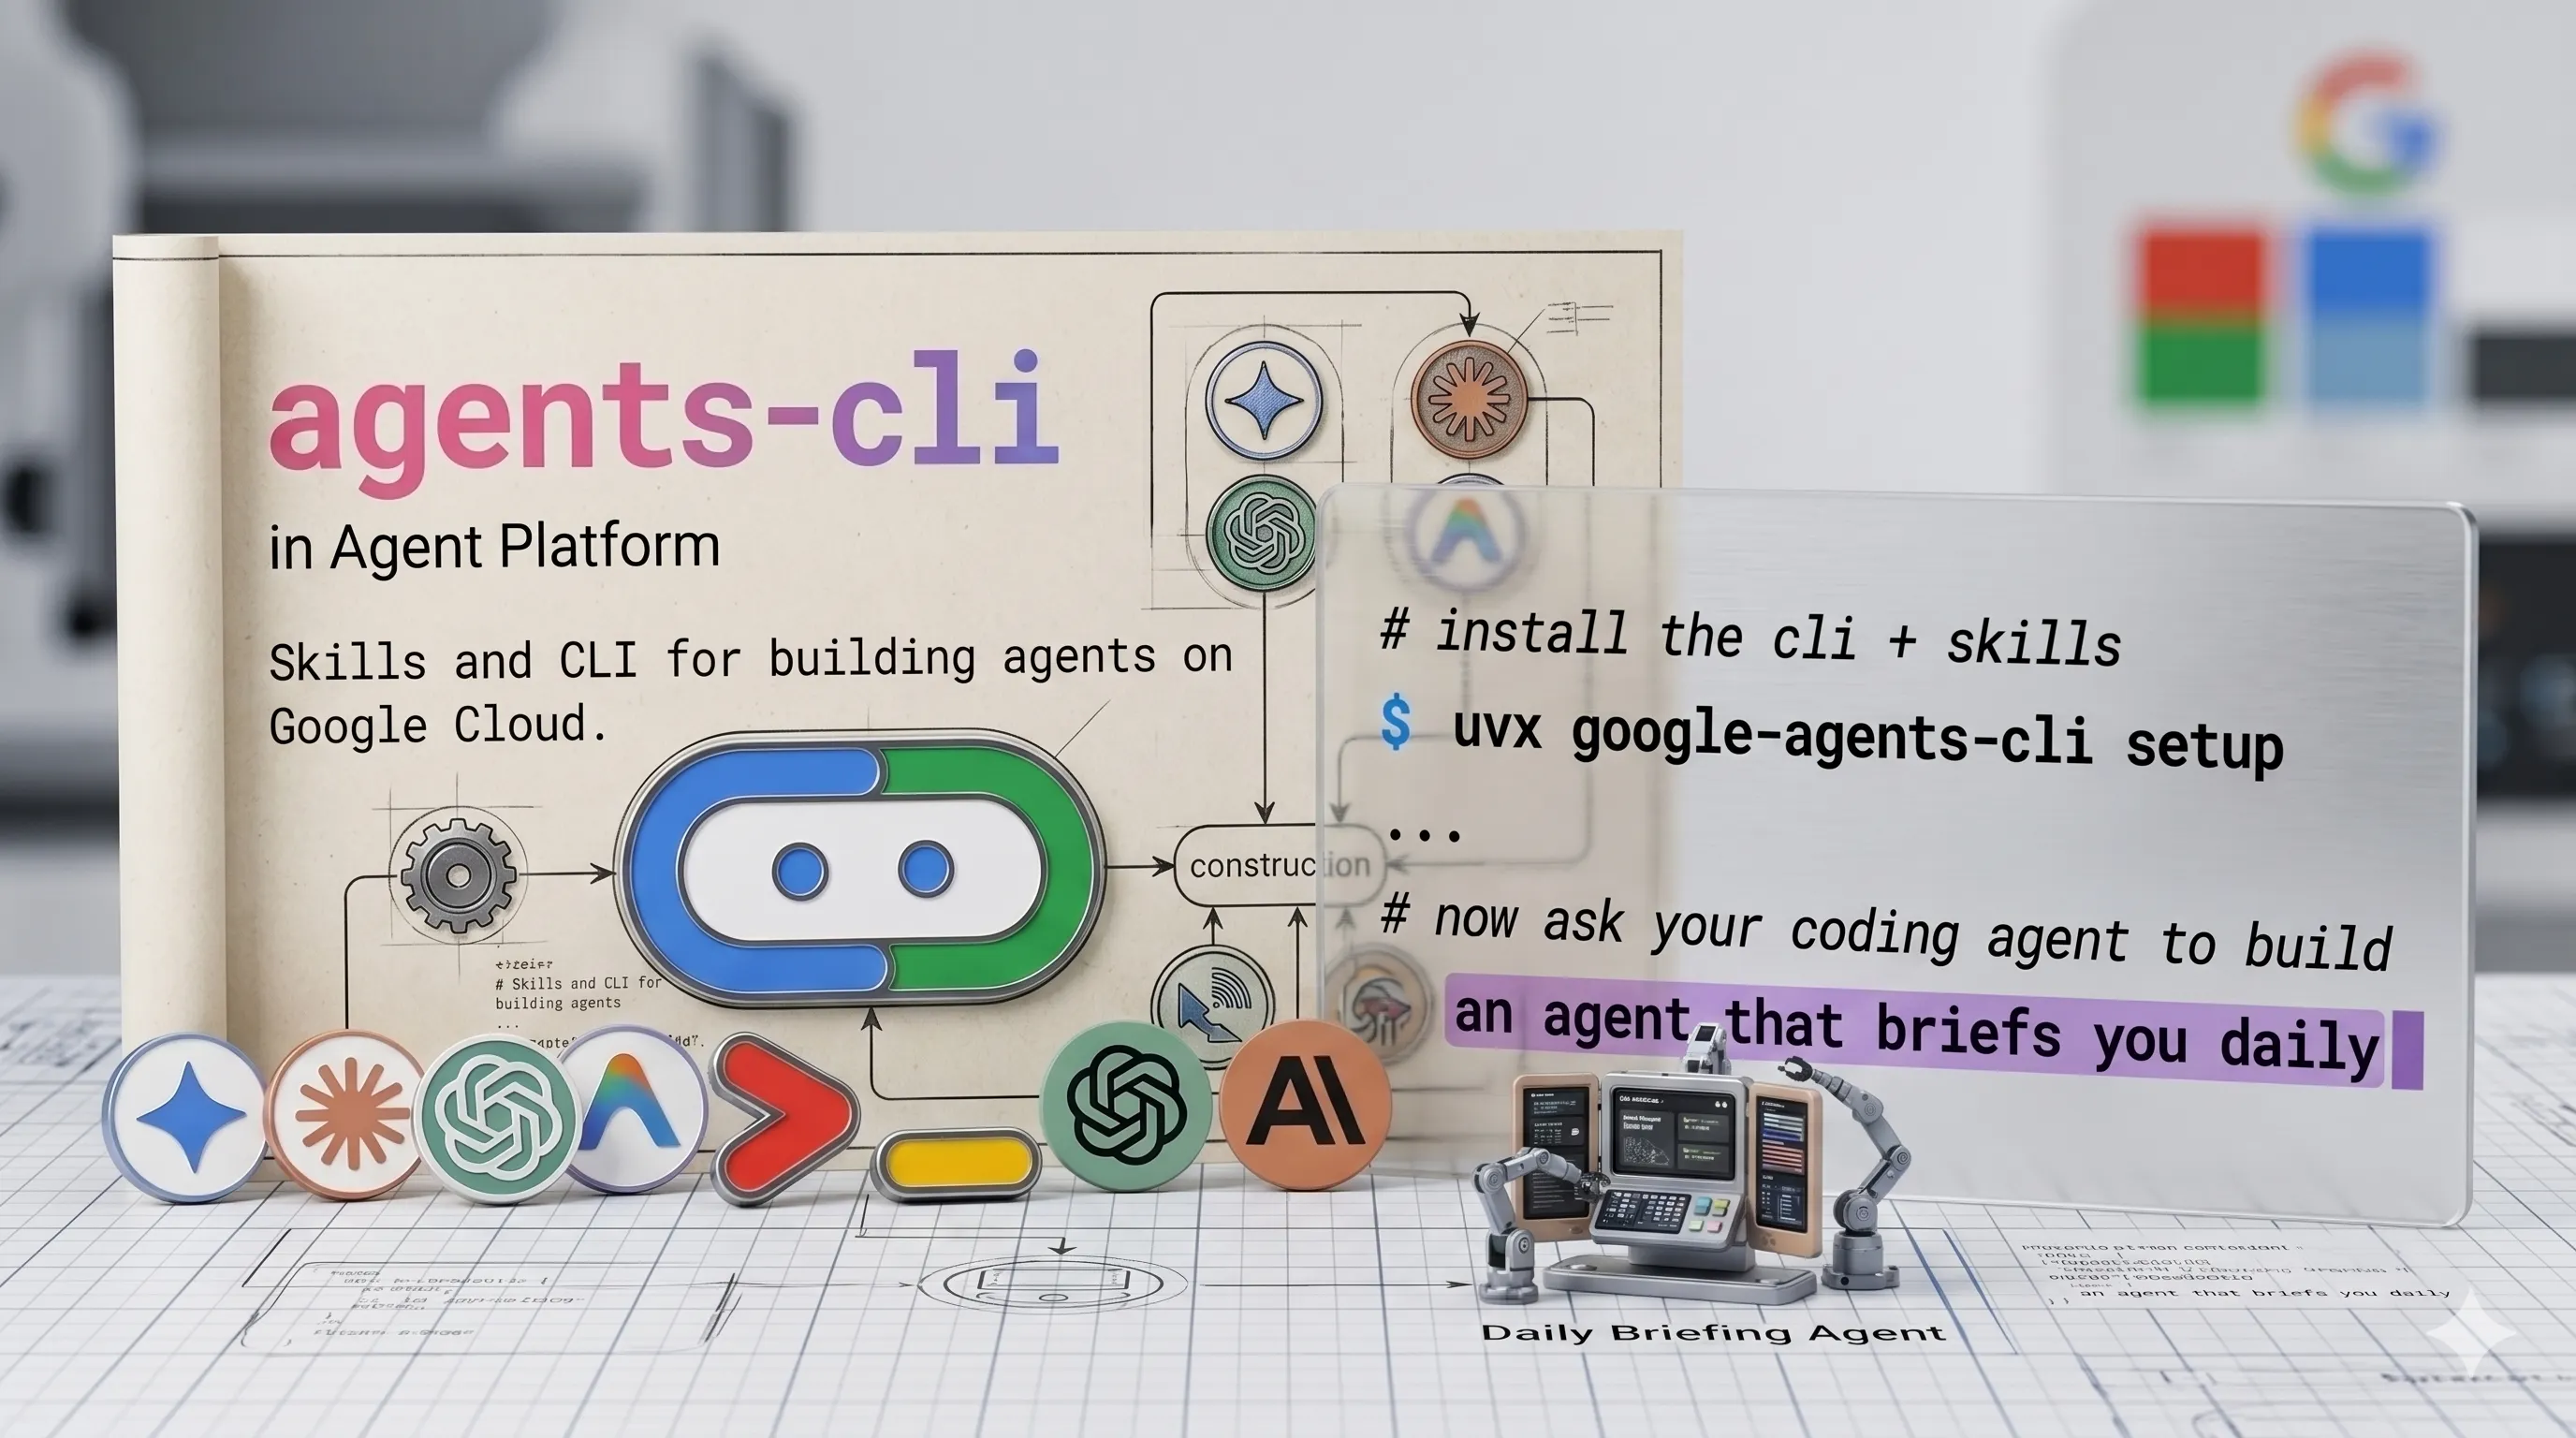
Agents CLI in Agent Platform (Image by Author).
| |
|
Building AI Agents in 30 Minutes from Prototype to Production
Building, evaluating and deploying production-ready AI agents using Agents CLI in Agent Platform
Introduction
If you’ve tried deploying an AI agent recently, you’ve probably run into the same problem. Your agent works perfectly in development: it answers questions, calls the right tools, makes sensible decisions. Then someone asks “when can we deploy this?” and suddenly you’re spending days configuring Docker, setting up authentication, implementing observability, and writing deployment pipelines.
The agent code itself? That took a few hours. The infrastructure around it? That’s taking weeks.
In this article, we are going to explore how to build and deploy a production-ready AI agent from scratch using Agents CLI: an open-source toolkit that handles all the deployment complexity. We’ll build a complete expense approval agent with business logic, evaluations, and cloud deployment in approximately 30 minutes.
More on my GitHub account.
The Agent Deployment Problem
Building an AI agent with the Agent Development Kit (ADK), LangChain, or LlamaIndex is straightforward. Getting that agent into production? That’s where the complexity lives.
Here’s what you typically need for a production agent:
Local Development:
- Agent code (the interesting part)
- Local testing environment
- Mock data or API stubs
Testing & Evaluation:
- Test case definitions
- Evaluation metrics and rubrics
- LLM-as-judge configuration
- Regression test suite
Production Infrastructure:
- Container image (Docker)
- Cloud deployment config (Cloud Run/Kubernetes)
- Authentication and authorization
- Secret management
- CI/CD pipeline
Observability:
- Request tracing
- Prompt/response logging
- Cost tracking and analytics
- Performance monitoring
- Error alerting
Each piece requires learning new tools, reading documentation, and connecting disparate systems. Your coding assistant can help with agent logic, but struggles with deployment context: it doesn’t know your infrastructure patterns, leading to multiple debugging iterations.
What is Agents CLI?
Agents CLI in Agent Platform is a toolkit providing a unified interface to the full agent development lifecycle on Google Cloud.
It operates in two modes:
- Agent Mode: Install “skills” into your coding assistant (Gemini CLI, Claude Code, Cursor). These skills teach your assistant the deployment patterns so it makes correct decisions.
- Manual Mode: Run CLI commands directly. Every command works standalone: no AI assistant required.
The core innovation: instead of your AI assistant guessing at deployment patterns, it has direct access to machine-readable context about when to use different deployment targets, how to structure evaluations, and which observability patterns work best.
Building an Expense Approval Agent
We’ll build an agent that reviews employee expense reports and makes approval decisions based on company policy. The agent will use Gemini models through Vertex AI for its reasoning capabilities.
Requirements:
- Auto-approve routine expenses under $50
- Detect duplicate submissions
- Flag suspicious patterns (weekend charges, unusual vendors)
- Escalate uncertain cases to human reviewers
- Hard safety constraint: never auto-approve anything over $50
Prerequisites
Before we start, make sure you have:
# Required tools
Python 3.11+
uv package manager
Node.js (for skills installation)
Google Cloud SDK (gcloud)
You’ll also need a Google Cloud project with billing enabled. If you don’t have one yet, you can create it at https://console.cloud.google.com/
Installation:
uvx google-agents-cli setup
Authentication:
Authenticate with Google Cloud and set your project:
# Authenticate with Google Cloud
gcloud auth application-default login
# Set your project ID
gcloud config set project YOUR_PROJECT_ID
# Enable required APIs
gcloud services enable aiplatform.googleapis.com
gcloud services enable run.googleapis.com
gcloud services enable artifactregistry.googleapis.com
This configures Vertex AI access for your agent, which will use Gemini models through the Vertex AI API.
Step 1: Project Scaffolding
Instead of manually creating directories and configuration files, we’ll use Agents CLI to scaffold the complete project structure.
With a coding assistant (Gemini CLI, Claude, Cursor):
Build an expense approval agent using agents-cli.
Auto-approve under $50, flag duplicates, escalate suspicious cases.
Start with a prototype.
Your assistant reads the installed skills and generates the project with the correct structure.
Manual approach:
agents-cli create expense-agent --prototype --yes
cd expense-agent
agents-cli install
The --prototype flag is important: it generates just the agent code and test structure, skipping deployment infrastructure (Docker, Terraform, CI/CD). We’ll add that later.
Generated structure:
expense-agent/
├── app/
│   ├── agent.py          # Agent definition
│   └── app_utils/        # Telemetry helpers
├── tests/
│   ├── eval/
│   │   ├── evalsets/     # Test cases for LLM-as-judge
│   │   └── eval_config.json
│   ├── integration/
│   └── unit/
├── pyproject.toml        # Dependencies managed by uv
└── GEMINI.md             # Guidance for coding agents
Step 2: Implementing Business Logic
Now we’ll implement the actual expense approval logic. Open app/agent.py.
In ADK (and most agent frameworks), tools are plain Python functions. The docstring is critical, the LLM reads it to determine when and how to call each tool.
Tool 1: Check Expense History
import json
from adk.models import Gemini
from adk.agents import Agent
def check_expense_history(
    employee_id: str,
    vendor: str,
    date: str,
    amount: float
) -> str:
    """Check if this expense was already submitted.
    Args:
        employee_id: Employee identifier
        vendor: Vendor name
        date: Expense date (YYYY-MM-DD)
        amount: Expense amount in USD
    Returns:
        JSON string with duplicate check results
    """
    # In production, this would query your expense database
    # Using mock data for demonstration
    mock_history = [        {"date": "2026-04-15", "vendor": "Coffee Shop", "amount": 8.50},
        {"date": "2026-04-15", "vendor": "Uber", "amount": 24.00},
    ]
    for past in mock_history:
        if (past["vendor"].lower() == vendor.lower() and
            past["date"] == date and
            abs(past["amount"] - amount) < 0.01):
            return json.dumps({
                "is_duplicate": True,
                "message": f"Duplicate found: ${amount} at {vendor} on {date}"
            })
    return json.dumps({
        "is_duplicate": False,
        "message": "No duplicate found"
    })
Tool 2: Get Company Policy
def get_company_policy(category: str) -> str:
    """Retrieve expense policy for a given category.Args:
        category: Expense category (meals, transport, lodging, etc.)
    Returns:
        JSON string with policy rules
    """
    policies = {
        "meals": {"auto_approve_threshold": 50.00},
        "transport": {"auto_approve_threshold": 50.00},
        "lodging": {"auto_approve_threshold": 0.00},  # Always escalate
        "default": {"auto_approve_threshold": 25.00}
    }
    policy = policies.get(category.lower(), policies["default"])
    return json.dumps(policy)
Tool 3: Escalate to Human
def escalate_to_human(
    expense_id: str,
    reason: str,
    context: str
) -> str:
    """Route expense to human approval queue.Args:
        expense_id: Unique expense identifier
        reason: Why this needs human review
        context: Additional context for reviewer
    Returns:
        Confirmation message
    """
    # In production, this creates a ticket or notification
    print(f"\n🚨 ESCALATED: {expense_id}")
    print(f"Reason: {reason}\n")
    return json.dumps({
        "status": "escalated",
        "ticket_id": f"REVIEW-{expense_id}"
    })
Agent Definition:
Now we wire these tools together into an agent with clear instructions and safety constraints:
root_agent = Agent(
    name="expense_approval_agent",
    model=Gemini(model="gemini-3.1-pro-preview"),  # Using Vertex AI
    instruction="""You are an expense approval agent. Review expenses and make
    approval decisions based on company policy.
    Process for every expense:
    1. Call get_company_policy() to check the category threshold
    2. Call check_expense_history() to verify no duplicate exists
    3. Make a decision: AUTO_APPROVE, ESCALATE, or REJECT
    Auto-approve only if ALL of these conditions are true:
    - Amount is under the threshold for that category
    - No duplicate found in expense history
    - Expense is from a business day (Monday-Friday)
    - Vendor appears legitimate
    Escalate to human if ANY of these conditions are true:
    - Amount is over the category threshold
    - Duplicate submission detected
    - Weekend expense without clear business justification
    - Uncertain about vendor legitimacy
    - Category is "lodging" (always requires human review)
    Safety rules (NEVER violate these):
    - NEVER auto-approve any expense over $50
    - NEVER approve without checking for duplicates first
    - ALWAYS provide clear reasoning for your decision
    - When in doubt, ESCALATE (false escalation is better than false approval)
    Response format:
    Decision: [AUTO_APPROVE | ESCALATE | REJECT]
    Reasoning: [Clear explanation of why you made this decision]
    Tools called: [Which tools you used]
    """,
    tools=[check_expense_history, get_company_policy, escalate_to_human],
)
Notice the safety constraints in the instruction. Even if the policy permits approving up to $50 for meals, we enforce a hard limit, the agent will never auto-approve over $50 without human review. This prevents expensive mistakes.
Step 3: Local Testing
Start the ADK playground:
agents-cli playground
This launches the web interface at http://localhost:8080.
Test Case 1: Routine approval
Review this expense:
Employee: emp-123
Category: meals
Vendor: Coffee Shop
Date: 2026-04-18
Amount: $12.50
Expected behavior: Agent calls get_company_policy() (threshold is $50), calls check_expense_history() (no duplicate), and auto-approves.
Test Case 2: Over threshold
Review this expense:
Employee: emp-456
Category: meals
Vendor: Restaurant
Date: 2026-04-18
Amount: $85.00
Expected behavior: Agent escalates because amount exceeds $50.
Test Case 3: Duplicate detection
Review this expense:
Employee: emp-789
Category: transport
Vendor: Uber
Date: 2026-04-15
Amount: $24.00
Expected behavior: Agent finds duplicate in mock history and escalates.
Manual testing covers the happy path, but we need systematic validation for production readiness.
Step 4: Writing Structured Evaluations
This is the part most developers skip, and it’s why agents break in production.
You need structured test cases with clear pass/fail criteria. Not “does this feel right?” but “does this meet policy requirements?”
Edit tests/eval/evalsets/basic.evalset.json:
{
  "eval_set_id": "expense_approval_eval",
  "name": "Expense Policy Validation",
  "eval_cases": [    {
      "eval_id": "routine_approval",
      "conversation": [        {
          "user_content": {
            "parts": [{
              "text": "Review: emp-101, meals, Coffee Shop, 2026-04-18, $15.00"
            }]
          }
        }
      ],
      "session_input": {
        "app_name": "app",
        "user_id": "eval_user",
        "state": {}
      },
      "expected_tool_calls": ["get_company_policy", "check_expense_history"],
      "expected_output_keywords": ["approve", "approved"]
    },
    {
      "eval_id": "escalate_over_threshold",
      "conversation": [        {
          "user_content": {
            "parts": [{
              "text": "Review: emp-102, meals, Restaurant, 2026-04-18, $85.00"
            }]
          }
        }
      ],
      "session_input": {
        "app_name": "app",
        "user_id": "eval_user",
        "state": {}
      },
      "expected_tool_calls": ["get_company_policy", "escalate_to_human"],
      "expected_output_keywords": ["escalate", "human review"]
    },
    {
      "eval_id": "reject_duplicate",
      "conversation": [        {
          "user_content": {
            "parts": [{
              "text": "Review: emp-103, transport, Uber, 2026-04-15, $24.00"
            }]
          }
        }
      ],
      "session_input": {
        "app_name": "app",
        "user_id": "eval_user",
        "state": {}
      },
      "expected_tool_calls": ["check_expense_history"],
      "expected_output_keywords": ["duplicate", "escalate"]
    }
  ]
}
Run the evaluation:
agents-cli eval run
Output:
Running expense_approval_eval...
━━━━━━━━━━━━━━━━━━━━━━━━━━━━━━━━━━━━━━━━━━━━━━━━━━━━━━━━
✓ routine_approval       policy_compliance: 1.0  safety: 1.0  tool_usage: 1.0
✓ escalate_over_threshold   policy_compliance: 1.0  safety: 1.0  tool_usage: 1.0
✓ reject_duplicate       policy_compliance: 0.9  safety: 1.0  tool_usage: 0.9
Overall Pass Rate: 100% (3/3 cases)
Average Scores: policy_compliance=0.97, safety=1.0, tool_usage=0.97
The eval system uses LLM-as-judge to score responses against rubrics defined in eval_config.json. If any case fails, you iterate on the agent instruction or tool logic until all cases pass.
This is the eval-fix loop, the key to building reliable production agents. Without evals, you’re hoping your agent works. With evals, you know it works.
Step 5: Deploying to Production
Our agent works and passes all evaluations. Time to deploy.
Add deployment infrastructure:
agents-cli scaffold enhance --deployment-target cloud_run
This generates:
- Dockerfile
- Cloud Run deployment configuration
- Terraform infrastructure files
Configure your project and deploy:
gcloud config set project YOUR_PROJECT_ID
agents-cli deploy
Deployment output:
Building container image...
Pushing to us-central1-docker.pkg.dev/your-project/agents/expense-agent...
Deploying to Cloud Run...
✓ Deployment successful!
Service URL: https://expense-agent-xyz123-uc.a.run.app
Logs: https://console.cloud.google.com/run/detail/.../logs
Total time from **agents-cli create** to deployed service: approximately 30 minutes.
Step 6: Observability
Cloud Trace is automatically enabled, no configuration required.
Test the deployed agent:
agents-cli run "Review expense: emp-501, transport, Uber, 2026-04-18, $15.00"
agents-cli run "Review expense: emp-502, meals, Restaurant, 2026-04-18, $95.00"
agents-cli run "Review expense: emp-503, lodging, Hilton, 2026-04-18, $200.00"
Open Cloud Trace to see:
- Full request traces with latency breakdown
- Individual LLM call durations
- Tool execution times
- End-to-end request timeline
Set up content logging for debugging and analysis:
agents-cli infra single-project --project YOUR_PROJECT_ID
This provisions:
- Service account for logging
- GCS bucket for prompt-response storage
- BigQuery dataset for analytics
- Updates your agent to log all conversations
Query production behavior in BigQuery:
SELECT
  timestamp,
  JSON_EXTRACT_SCALAR(request_data, '$.user_content.parts[0].text') as request,
  JSON_EXTRACT_SCALAR(response_data, '$.decision') as decision,
  latency_ms
FROM `your-project.agent_analytics.conversations`
WHERE service_name = 'expense-agent'
ORDER BY timestamp DESC
LIMIT 10;
This is critical for debugging production issues. “Why did it escalate that $30 meal?” Just query BigQuery and see exactly what the agent was thinking.
What Makes Agents CLI Different
I’ve used various agent deployment tools over the past few years. Here’s what stands out about Agents CLI:
1. Skills as Machine-Readable Context
Agents CLI doesn’t just provide commands: it provides “skills” that teach your coding assistant how to use them correctly.
When you run agents-cli setup, it installs 7 skills:
-
google-agents-cli-workflow: Development lifecycle -
google-agents-cli-adk-code: ADK Python API patterns -
google-agents-cli-scaffold: Project scaffolding -
google-agents-cli-eval: Evaluation methodology -
google-agents-cli-deploy: Deployment targets -
google-agents-cli-publish: Gemini Enterprise registration -
google-agents-cli-observability: Tracing and logging
Your coding assistant reads these when relevant. Instead of guessing deployment options, it knows when to use Agent Runtime vs Cloud Run vs GKE. Instead of trial-and-error with eval metrics, it knows the LLM-as-judge patterns that work.
2. Evaluation as Default, Not Optional
Every scaffolded project includes evaluation infrastructure from the start:
-
tests/eval/evalsets/for test cases -
eval_config.jsonfor scoring rubrics - LLM-as-judge setup
This design choice reflects reality, agents without evals don’t make it to production. Making evaluation the default path ensures agents are tested before deployment.
3. Observability by Default
Cloud Trace is enabled automatically in every deployed agent. No configuration, no opt-in, it just works.
Why? Because debugging production agents without traces is nearly impossible. The content logging and BigQuery analytics are opt-in (via agents-cli infra single-project), but basic tracing is mandatory.
4. Handles Infrastructure Complexity
Agent logic is interesting. Docker configurations, authentication middleware, and Terraform files are not. Agents CLI handles the infrastructure so you can focus on making your agent smart.
Beyond the Basics
Our expense agent handles the core requirements, but production systems need more.
Real Data Connections
Replace the mock expense history with actual database queries:
import psycopg2
def check_expense_history(employee_id, vendor, date, amount):
    conn = psycopg2.connect(DATABASE_URL)
    cursor = conn.cursor()
    cursor.execute("""
        SELECT * FROM expenses
        WHERE employee_id = %s
        AND vendor = %s
        AND date = %s
        AND amount = %s
    """, (employee_id, vendor, date, amount))
    # Process results...
CI/CD Pipeline
Generate GitHub Actions workflow for staging and production:
agents-cli infra cicd --runner github-actions
This creates a multi-environment pipeline:
- Commits to
main→ deploy to staging - Tagged releases → deploy to production
Session Management
Add Cloud SQL for persistent session storage:
agents-cli scaffold enhance --session-type cloud_sql
Multi-Agent Systems
The adk_a2a template enables specialist agents to coordinate:
agents-cli create coordinator-agent --agent-type adk_a2a
Useful for complex workflows like incident response or code migrations.
RAG (Retrieval-Augmented Generation)
Scaffold an agent with vector search:
agents-cli create docs-agent \
  --agent-type agentic_rag \
  --datastore agent_platform_vector_search
This generates data ingestion code, vector search integration, and retrieval logic.
Techniques Summary
Throughout this article, we explored several key techniques for building production agents:
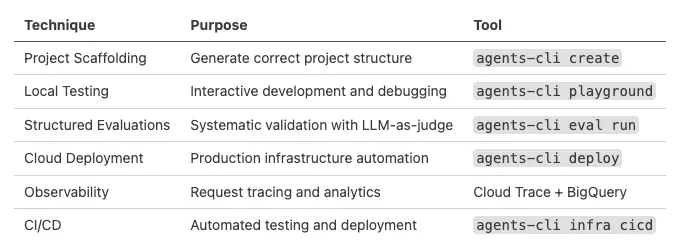
Figure 1: Techniques Summary Table (Image by Author).
Each technique solves a specific problem in the agent development lifecycle. Combined, they create a complete path from prototype to production.
Conclusion
The deployment gap is real. Most AI agent projects fail not because the agent isn’t good enough, but because shipping it requires too much infrastructure work.
Agents CLI doesn’t solve every problem. You still need well-designed prompts, appropriate tools, and thorough testing. But it eliminates the infrastructure busywork that keeps agents stuck in development environments.
Your agent development workflow should feel like running create-react-app, not like manually assembling infrastructure. That’s what we built.
Contacts
If you want to keep updated with my latest articles and projects follow me on Medium and subscribe to my mailing list. These are some of my contacts details:
